
When you purchase through links on our site, we may earn an affiliate commission. Here’s how it works.
Choosing the specific point at which to start page numbering in Microsoft Word can significantly enhance the organization and professionalism of your documents. This feature is especially beneficial when creating formal documents, such as reports with cover pages and tables of contents, where you might prefer to start numbering on page 2 or page 3. By customizing page numbering, you ensure that your document meets the standard formatting expectations for academic or professional submissions.
By default, Microsoft Word begins page numbering from the first page, which might not always align with the document's intended structure. This default setting can be inconvenient if you need to exclude certain sections, such as title pages or introductions, from the page count. Fortunately, Microsoft Word provides a straightforward way to modify page numbering to enhance both readability and user experience, allowing you to present your information more clearly.
Below, we provide a detailed guide on how to implement this feature, including preparatory steps to help you set up section breaks and customize page numbers in Microsoft Word.

To start page numbering from the second page or later in Microsoft Word, you must first divide your document into sections. Creating section breaks allows you to specify where page numbering should begin, enabling you to start numbering from any page you choose.
First, go to the top of the page where you want the numbering to begin and click on the Layout tab in the ribbon at the top of the screen. This will display a set of commands related to page formatting.
Next, click the Breaks dropdown menu to view different types of section breaks available. Depending on your document's needs, you can select from several options, but the Continuous option is often the most suitable. Choosing this option will insert a new section break at your cursor's position on the page.
Once you've inserted the section break, your document will be divided into two parts: the first section containing pages without numbering and the second section where page numbering will begin.
Next up is inserting page numbers for the whole document. Navigate back to the top ribbon and click the Insert tab. Locate the Header & Footer section and go into the Page Number dropdown menu.
You can now choose from the Top of Page, Bottom of Page, and Page Margins options, depending on where you want the page numbers to appear.
Once you have selected the desired location and a number style, which includes its alignment, bold text, brackets, and more, the whole document should now have page numbers.
Now we need to unlink this page numbering across the two sections you created in the previous stage.
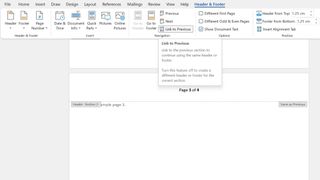
Double-click either the header, footer, or margin on any page in the section you want numbered, according to where you decided to put your page numbers. This should create a new tab in the top ribbon labeled Header & Footer, with a series of commands listed below it.
Looking at Navigation, the Link to Previous option should already be selected by default. Turn this off by clicking on it, which should mean the sections you created in the preparation stage should have separate page numbering.
By separating the numbering between the two sections, you can now begin page numbering from your selected starting page. By default, the page number corresponds to the actual page position within the document.
However, you may want to change this, particularly if you're writing a book or an academic paper that includes a title page or cover page and requires the numbering to start at 1 on a later page. To do this, place your cursor on any page within the section where you want the numbering to begin.
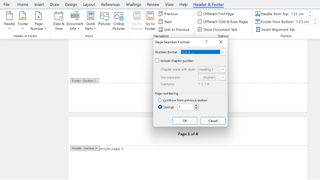
Next, go to the Insert tab and open the Header & Footer section, or double-click the header, footer, or margin where the page number appears. This will activate the Header & Footer ribbon. Click on the Page Number dropdown menu and select Format Page Numbers.
In the Format Page Numbers dialog box, locate the Start at field at the bottom and enter the number you wish to begin with, such as 1. Click OK to apply your changes.
The final part of the process is to remove any page numbers from pages you don't want to count, such as the cover or table of contents.
Click your cursor on any page in the section that should have no numbering – presumably, the first few pages of the document. Locate the Page Number dropdown within the Header & Footer commands and click Remove Page Numbers.
Because you’ve unlinked the sections created in the preparation step, the first section should now be number-free. The rest of the document should be numbered, starting with the page separating the two sections.
If you want to display page numbers in a different format, such as using Roman numerals for the introductory section of your report, you can easily adjust this using the menu options described in Step 4.
To change the number format, open the Format Page Numbers menu. Start by clicking the Insert tab, then go to the Header & Footer section, and select the Page Number dropdown menu. From there, choose Format Page Numbers. At the top of the dialog box, you'll find the Number format dropdown, which offers several numbering styles, including Roman numerals.
Once you've set up page numbering in your document, you can further customize the appearance to ensure it matches the style and tone of your document. Microsoft Word offers various options to personalize how your page numbers look, helping to create a more polished and professional presentation.
To change the font or size of your page numbers, double-click on the header, footer, or margin where the page numbers appear. This will activate the Header & Footer Tools. Highlight the page number you want to customize, then navigate to the Home tab. Here, you can select a different font, adjust the font size, or apply styles like bold or italics to make your page numbers stand out or blend seamlessly with the rest of your document.
Microsoft Word also allows you to apply effects to your page numbers, such as shadows or outlines, to give them a distinct look. With the page number selected, go to the Format tab under Drawing Tools (which appears when a text box is selected) and explore various text effects available under the Text Effects button. These can add a professional touch to your document, especially for formal reports or creative projects.
If you wish to change the alignment of your page numbers, such as centering them at the bottom of the page or aligning them to the right, you can do so by selecting the page number and choosing the desired alignment option from the Paragraph section in the Home tab. This allows you to ensure consistency throughout your document and adapt the layout to your specific needs.
Receive our latest news, industry updates, featured resources and more. Sign up today to receive our FREE report on AI cyber crime & security - newly updated for 2024.
By submitting your information you agree to the Terms & Conditions and Privacy Policy and are aged 16 or over.
By taking the time to customize the appearance of your page numbers, you can enhance the overall visual appeal of your document, ensuring it meets both your aesthetic preferences and professional standards.
Starting page numbering from a specific page can greatly enhance the readability of your document, especially when dealing with academic or professional papers. This approach ensures that only relevant sections are numbered, improving clarity and organization.
Although it typically takes just a few minutes, adjusting section and page number settings can become complex. Therefore, we recommend dividing your document into sections before you start. This preparation simplifies the process and prevents potential issues.
Once the sections are created, you can easily set the starting point and format for page numbering in the desired section. This approach allows you to manage your document more efficiently by ensuring that unnecessary numbering is omitted from the initial section.
You can further advance your Microsoft Office knowledge by reading our guides on:
Ioana holds a BSc in Business Management from King's College London, and has worked for over four years as a management consultant in the industries of technology, media and telecoms. Ioana is also a successful entrepreneur, having launched several social enterprises. Writing interests include market research and planning, start-up culture and ethics, agile methodology, and financial modelling. No stranger to tech and hackathons, she is also an accomplished fintech and SaaS writer.